Be More Productive with Focus.me and Writer!

Downloading Focus.me

To download Focus.me you must first access the chrome web store . Once here type in the search bar focus.me and hit enter. Focus.me will be the first option under the title ‘Extensions’. Click ‘add to chrome’ and you can begin your experience.

Options and Settings

To access options, right click on the icon

  • User Preferences: In this part of the options and settings page you can select the time increments for site blocking. You can also modify the list of sites to be blocked when focus.me is activated.
  • Import and Export: In this part of the options and settings page you can import or export your list of blocked websites. This can be helpful when sharing lists with others who have the same extension

How Focus.me Helps You

Focus.me is a unique extension that aims to help you stay focused by blocking self-selected websites. One of the key features of this extension is that once you set the time for websites to be blocked, you can’t unblock them until the time runs out.

How to Access Writer

First things first, you must download Writer. To do so, you must go to the chrome web store and type in the search bar “writer”. This app will be the first option under the tab labeled “Apps”. Click add to chrome and you are ready to begin. To access the app click on the 9 little box icon in the top left corner of your screen. This will pull up all your apps. Select writer and begin writing your masterpiece!

How it Works

Once you open the app you can begin writing. To access options click on the gear icon at the bottom middle of the screen.

  • Interface: This tab is where you can choose the color of the font or background. You can also choose the font type and size as well as line spacing. You can also enable typing noises and keyboard shortcuts. On the right-hand side of the screen, you can see a sample of the changes you make to the display.
  • Account: In this tab, it displays your user information such as OpenIDs and your email address. Here you can edit personal information and change your password.
  • Extras: In this tab, you can select different options to aid you in writing. You can type in how many words to a page for page counting and other features. This tab also shows features you can use if you upgrade to a pro account.

Why does Writer Help You Stay Focused?

Writer helps you stay focused when writing because the interface is simple. There are limited options as far as things you can do to the document so it is easier to stay focused when writing. The default settings for Writer are a black background and green font so this blocks out all distractions on the screen. This app helps you to stay on task while writing masterpieces!

Declutter with Toby

Declutter with Toby

Declutter with Toby

Everyone hates having millions of tabs open at once. It’s super stressful and looks cluttered. Luckily, there’s Toby, a useful extension that de-clutters your tabs and organizes them into one page.

How to get Toby

  • Click on the link here which will download the extension. The extension will appear next to your search bar
  • Sign up for a free account with your email

How to use Toby

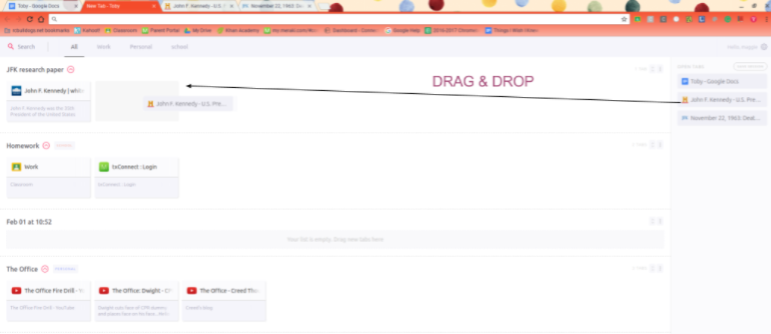
  1. Now that the extension is downloaded, every time you open a new tab the Toby screen will appear. The tab will read “New Tab- Toby.” On this screen, it displays all of your open tabs and lists. A list is a collection of websites that you have saved. These can range from project references to funny youtube videos.
  2. To add a new list for homework, school, research papers, etc. just click the pink plus sign at the bottom right side of the page. This lists organizes all your tabs into one list for quick and easy access. From here you can add open tabs onto that list.
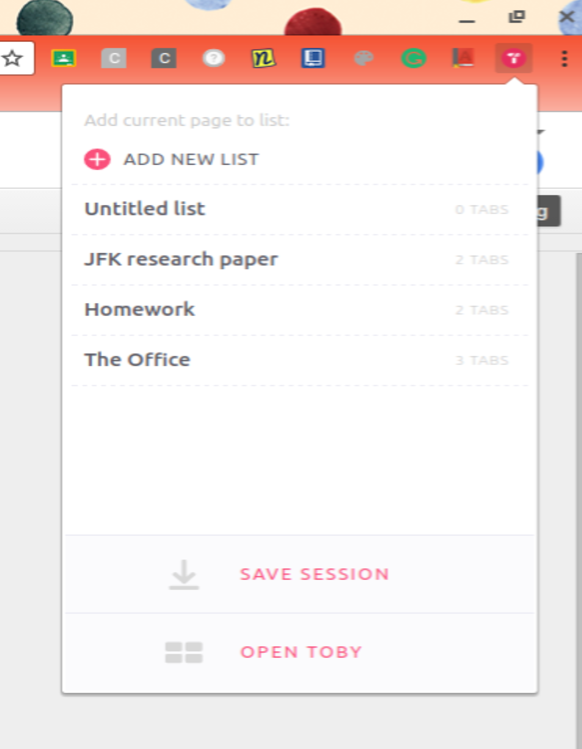
  3. You can access your lists by opening a new tab or by clicking the Toby icon in the upper right-hand area.

When you open the Toby Tab, it should look something like the image to the left.

You’ll Go Totally Bananas For Picmonkey!

Picmonkey is an app for chrome and desktop that allows you to edit photos and make collages using unique graphic design features. The best part of Picmonkey is that it is completely free to use! (Some features are locked, but you can upgrade to Royale Membership for full access to them) Some key features that Picmonkey offers is that you can add frames, themes, overlays, and touch up your original photo.


Downloading & Accessing Picmonkey

To download Picmonkey you need to go to the chrome web store. Once you have accessed the chrome web store, type in the search bar “pic monkey”. Click on the first option under “Apps”. Click on the button “add to chrome” and you are ready to start using Picmonkey. To access Picmonkey, go to the page where all your apps are listed. The Picmonkey app icon should be towards the top of your list (it looks like a monkey so it shouldn’t be too hard to find)


I Downloaded Picmonkey…Now, what?

Once you have opened the app, click on the button that says ‘edit a photo’. This will bring you to the main interface of Picmonkey. This page is where you can begin editing your photo to perfection!


How do I Upload My Photo Into the Editor?

To upload a photo to Picmonkey click on the drop down arrow on the button titled “Open” at the top left of your screen. A drop down menu should appear with many options as to where to upload your picture from (Facebook, Pixlr, OneDrive, etc) Once you have selected a photo and successfully uploaded it to the Picmonkey you are ready to proceed with editing.


What Can I do With Picmonkey?

Picmonkey offers many different options when editing photos.  In the toolbar to the left of the screen, there are several tools to use such as Basic Edits, Effects, Touchup, Text, Overlay, Frames, Textures, Themes, and Templates.


  • Basic Edits –  this tool is used to do basic editing such as cropping, resizing, or rotating photos. Some more options in this tab are to sharpen photos or add color to them.
  • Effects – this tool is used to add gorgeous effects to your photos that make them stand out above the rest.
  • Touchup –  the purpose of this tool is touch up any blemishes when editing a photo that has a human face in it.
  • Text –  the text tool can be used to add text boxes to your uploaded image; also found within this part of Picmonkey is different font types.
  • Overlay – the overlay tool is used to add more elements to your photo. You can either add your own or choose one of the ready-made overlays.
  • Frames –  the frames tab is where you will find several different types of frames to add to photos.
  • Textures – this tool is used to add different textures to your pictures such as space, burst, and light trails.
  • Themes – the theme tool is where you can choose a theme (these consist mostly of festive themes) and add elements of that theme to your chosen picture.
  • Templates – this tool is used to create posters, diagrams, invitations, and cards (most templates are only available for Royale)


Saving Photos On Picmonkey

To save your design, click on the Save button in the top left corner of your screen (to the right of the ‘open’ button). Once you have clicked this button, you can customize the name of the file and resolution. Click “Save to my computer” to save it Onedrive or Dropbox. If you don’t have either application you can simply download your image.


Sharing Images From Picmonkey

To share an image/photo click on the “Share” button to the right of the Save button. When you click this, Picmonkey will allow you to choose what platform you would like to share it on (Facebook, Twitter, Pinterest, etc). You also have the option to caption your photo before sharing. Click on the button titled “Do it” once you have selected where you want to share the image to. Your photo has now been shared on the app of your choice.
Happy editing everyone!

Access on Chromebooks

Access on Chromebooks

Lately, we have been receiving more than a few questions about turning on and off access to different components on the Chromebooks.  Although there are numerous functions on the Chromebook that require a Chrome Squad member to access and change, there are also a few components that can be switched on and off manually without the C4L’s assistance.  The following is a list of functions that you have access to on your Chromebook:


  • Keyboard Settings:


      1. If you have a foreign language class that has required you to add the US International Keyboard settings, you might find yourself forgetting to turn that off when you go to your next period.  Keeping this type of keyboard component on can prohibit you from other keystrokes in the future.  To change the keyboard settings back to its original US Keyboard function, all you have to do is click on your account icon at the bottom right hand corner of your screen.  Click on the keyboard icon (second row).  There, you will be able to change the settings by clicking back on US Keyboard.


  • Bluetooth:


      1. Bluetooth enables you to wirelessly send files back and forth between another electronic device.  To enable or disable your Bluetooth settings, just click on your account icon at the bottom right hand corner of your screen.  Click on the Bluetooth icon (fourth row).  There, you will be able to turn on or off Bluetooth.


  • Wifi:


      1. There are quite a few students that come into the C4L Lounge with questions about their wifi.  To manage your wifi settings, all you have to do is click on your account icon at the bottom right hand corner of your screen.  Click on the wifi icon (third row).  There, you will be able to choose from the multiple wifi accounts available at Royse City High School.  I recommend choosing RCISD-Guest since it is the only one that doesn’t require a password and is the easiest to access.


  • Sound Settings:


    1. In my past short experience of being a member of the Chrome Squad, I’ve encountered a couple of classmates who have had trouble with their sound settings.  Usually, when they went to plug in their headphones, they couldn’t hear any sound being emitted or it would seem as if their speakers had been blown out.  A reliable solution to this problem is clicking on your account icon at the bottom right hand corner of your screen.  Then, click on the arrow pointing right that is beside your sound bar.  You can then change your Output settings to Speaker (Internal) and your Input settings to Microphone (Internal).  Doing so should take care of the issue.

Hopefully, these four solutions will come in handy if you ever have any problems with accessing different settings on your Chromebook.  If you still have any questions, don’t be shy to swing by the Chrome Lounge and look for either Mr. Holt or one of our C4L members to lend you a hand.  We will always be here for your technology needs!

Using Infographs in the Classroom

Infographs/infographics are a great way to visualize and organize information.  A quick Google search will show millions of infographs with info ranging from the parts of a hamburger to the impact of plastic waste on marine life.  The reason for the rise in the popularity of infographs is largely due to the fact that they no longer require the knowledge of a graphic design to create.  Sure, you can use Photoshop or Illustrator, but other free web tools, like Google Drawing and Piktochart, make infographics accessible to everyone.

In regards to data or historical facts it is easy to see the value of putting the information in a visual format like infographs.  What is less obvious is how infographs can be used to explain intangible information like analysis or mathematical theorems.  I recently had my students create infographs charting/explaining motifs in the first five chapters of The Great Gatsby.  I gave them four simple guidelines and two means by which to create the infographs.

Guidelines:

  • The infograph must have 5 or more graphical elements (i.e. charts, graphs, pictures, etc.)
  • The infograph must show the progression of the motifs
  • The infograph must cite evidence of the motifs throughout the first 5 chapters
  • The infograph must explain the importance of the motifs
Creation Options:
  • You can create the infographic on butcher paper
  • You can create the infographic using Piktochart or Photoshop
For those of you that don’t know Piktochart is a free, web-based infograph creator.  It took a little time for the kids to get accustomed the the user interface, but once they did it was second nature for them.
It was also important to publish the infographs for a real audience.  So they added them to their blog, and I added them to a Thinglink (above) that I tweeted out.

The Basics of Google Drive

Many of you have files and folders saved on flash drives and local drives on your main workstation. It is beneficial to have these files in your Drive account so that you can access and edit them anywhere. This blog post should help you with this (and yes this is a shameless plug for my own blog).

While you are waiting for your files to upload you can enjoy this music video from my cousin Andi’s band The Show Ponies. She’s the red head.

Now that is done we can move on to how to navigate and use Drive. This first video is about 18 minutes long but does a great job of introducing you to all the basic functions of Drive. It uses the older version of Drive, so if, or when, you begin using the new version of Drive you will notice a slight difference in layout and naming of features.

Once you have started to create files and add files to Drive you will need to organize them. The following video is a quick tutorial on how to create folders and organize files.

Now that your files are uploaded and organized it is time to collaborate. The following video shows you how to share and collaborate with Google Drive.

This article is Google’s catch all, and be all, of Drive information. I cannot more highly recommend this resource. You need to take a look at all the resources available on this site.

Seeing it in Action

Being a teacher I am always trying to find new ways to teach my kids and new tools to make my life easier. Lets be honest, teachers love it when we can make life easier while giving kids a stellar education. Lets be even more honest, not much about the educational machine is meant to be easy. Now that I have said that, I want to talk briefly about how Drive has made life easier for me.

First, I utilize Google Docs in my professional learning communities. I have, including myself, five people on my team and it can be difficult to coordinate all of us. To help with this we use a common Google Doc that we can all use in real time to create and share notes and planning ideas. We can then go back at any point and reference what we talked about in our meetings. We use a shared Google Calendar to keep ourselves organized. We can create, edit, and chat about upcoming lessons. We also create the calendar in a Google Sheet so that we can share the document with parents that want to know what is going on in the classroom.
(I also used “we” to start four consecutive sentences. I would typically discourage my students from this. I might change it later if I’m up to it… Crap! I did it again.)

Another useful tool for me in the classroom is the marriage that is Google Forms and Google Sheets. I create Google Forms for students to fill out so that I can get contact information. I create Google Forms to create exit tickets. I create Google Forms to pool interest in a topic or to schedule events. (I did it on purpose this time.) The great thing about Forms is that the data automatically populates a Google Sheet so that I can manipulate and analyze the data.

That is about all I have to say in this post. There will be a follow up post that will focus on more advanced features of Drive. But before I leave you I would like to give you a few reasons to switch the the new Google Drive. The Drive allows you to edit Office files without Office, share documents in a more streamlined manner, and so much more. Google Drive’s blog has a comprehensive article on the changes to Drive. It is worth the read.

Thanks for taking the time to check this post out.

Cody