Getting Google Apps and Extensions

Heady Academic Stuff:

Extensions are bits of computer code added to the Chrome browser to add to the functionality of the browser. It is like supping up your car, or upgrading the appliances in the kitchen. Chrome will work well without extensions, but extensions make it awesomer (technically that isn’t a word but you get what I am saying).
Apps are essentially shortcuts to websites. They may be customized by the developer to work seamlessly with Chrome and Google Drive, or they might just be shortcuts. Either way they are a great way of keeping close access to websites that are useful to you.

Now, before I get too far into this I would be remiss to not tell you that installing extensions and apps is slightly different on a Chromebook vs a Chrome browser. You need to access the store no matter what, but those two platforms access the store differently. The Chromebook has a Store app located in the app tray (those nine dots in the lower left corner of the screen). It should be the second icon you see. The Chrome browser is different. You will see the same app tray, or nine dots, in the upper right corner of any Google page or you can go to this site: https://chrome.google.com/webstore/

From there you can begin searching for extensions and apps.

Extensions

Now that you are to the Chrome store you can start looking for things to add. Lets start with extensions. On the left side of the Chrome store is the search field that you can use to find extensions by searching for either a name or what you want it to do. For example, I want to be able to do a Google search just using my voice (using your fingers to type is just too much work). I would just type “voice search” in the search field. This brings up both apps and extensions that meet the search criteria. I can limit that search by selecting from the the options beneath. Once you find the extension you want click FREE to add it to your Chrome browser.

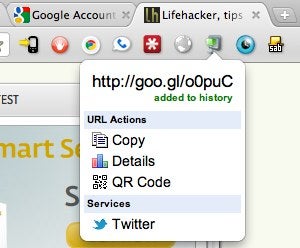
My new extension is the microphone on the left.

Extension will appear as icons next to, and in some case in, the URL bar. To use the extension you will click on it, verify information (you only have to do it once), and then you are off. Right clicking on an extension will give you access to adjust setting and delete the extension. If you don’t know where to start with extensions you can take a look at my favorites here.

Apps
The process for finding and installing apps is the same as extensions, but they are housed in a different location. On a Chromebook apps are housed in the app tray. It is a little more cumbersome to access apps from a Chrome browser. You can access them by typing “chrome://apps” into the URL bar or by clicking the “Apps” shortcut in the bookmark bar (if you have that enabled). The first thing I would do after installing an app is installing the extension “Blackmenu” to make it easier to get to your apps in a Chrome browser. I have several more apps to add to my list but what I have so far should get you started.

So I Got a Chromebook…

..and now it is time to do some damage–or not. My school just issued Chromebooks to all of its teachers. I have excitedly waited for this over the past few months because, despite the naysayers, it is a surprisingly functional tool. I will most likely churn out several Chromebook specific posts, but I decided to only include three features in this post–Google Cloud Print, Chrome Remote Desktop, and the “Keyboard Shortcut App” (which doesn’t have an official name). These three stood out to me as immediately usable as I began familiarizing myself with the device and making it my own. Hopefully, they are as useful for you as they have proven to be for me.

Google Cloud Print
So, Google Cloud Print. The name sort of explains everything. It allows you to print wirelessly using Google’s services. It is a feature universal to all Google products. You can use Google Cloud Print (GCP) with an GCP enabled printer or any printer connected to a computer with a Chrome browser. What makes this so vital is that you can’t directly connect a printer to a Chromebook. Connecting to a GCP equipped printer is as easy as opening a print dialogue (ctrl+p) in any chrome window or tab, selecting the printer, and clicking print. Unfortunately, my school doesn’t have GCP equipped printers. Fortunately, like I said earlier, you can connect to any printer using GCP as long as you have a computer connected to it that has Chrome–one more reason why you should make the switch to Chrome if you haven’t already.

To set up GCP at my school I did the following (which should be the same for anyone):
1. Open Chrome on your desktop (this is the computer connected to the printer)
2. From the Menu (it looks like this) select Settings, which will open a new tab.
3. Scroll to the bottom of the window and select show advanced settings.
4. Find the Google Cloud Print section (third from the bottom) and select “Manage”.

4.This will open up a new tab with the printer management dialogue. It looks something like this:

5. Select “Add printers”. This will bring up a menu where you can select the printers connected to your computer. (If your school uses network printers like mine, you will need to make sure they are installed on your desktop first.) The dialogue should look like this:

6. Select the printers you want to add, press “Add printer(s)”, and follow any other directions that follow.

Once this is done you can print from your Chromebook anytime you want as long as the printer and connected computer are on and awake.

You can also share printers with other users so you can stay logged into Chrome with your personal account on your home computer and still print from your Chromebook at home. Navigate to this tutorial for instructions.

Chrome Remote Desktop
There are all kinds of screen sharing applications out there. Some work better than others, but most require a purchase of some sort in order to get full functionality. Chrome Remote Desktop (CRD) only requires two computers using Chrome and an internet connections and you can remotely control your desktop from your Chromebook. You may ask why would you ever need to remotely access your desktop. Let me propose some reasons. A main complaint about Chromebooks is their lack of functionality, but you have the full functionality of your desktop when you remote in from your Chromebook. Maybe you saved something to your desktop instead of Drive. Remote in and you have access to all the files on your desktop. I have used it to update a Photoshop document on my iMac at home and a Excel spreadsheet saved on my desktop in my classroom, all while sitting in the teacher workroom waiting on copies. Now tell me that is not both cool and useful rolled into one ball of awesomeness. The process of setting everything up is a little involved (though easily accomplished even by novices), so I am just going to direct you to Google’s directions.

Keyboard Shortcut “App”

The keyboard shortcut “app” allows you to see what actions can be completed
with just a key combination.
Alright, so there isn’t an official name for this and I’m not sure that it is an app, but it works extremely well and is easy to use. This thingy-wopper brings up a visual, and interactive, layout of your Chromebook’s keyboard and allows you to see all the keyboard shortcuts your Chromebook can preform. There are a lot of keyboard shortcuts, and they make it so that you rarely have to take your hands off the keyboard to navigate the computer. You may not think much of it–lots of devices have lists of keyboard shortcuts–but this is the first I’ve seen that is both easily accessible and easy to navigate. To begin, press ctrl+alt+/. It will bring up the “app”. From there follow the instructions. When you are ready to exit the interface, you press ctrl+alt+/ again. You can access this feature from anyplace in your Chromebook.

Most Asked Questions About Google Drive

This led me to writing this blog post. I’m going to attempt to explain how you can transfer all of your files from your computer (whether it be h drive, my documents, or any other location) to your Drive account.

Prepping Your Files to Transfer
So first things first, you need to prep your files for transfer. If you are like me you have files tucked within folders which are tucked within folders, and they are in turn tucked in more folders. You also probably don’t want to recreate all of that organization. Thankfully, there is an easy way to accomplish this:

1. Create a new folder in a location you can find (like the desktop) and name it something you will remember. In most cases you can right click and select “create new folder”. Once everything is said and done you will delete this folder.

2. Copy and paste all the files/folders you want to move to this newly created folder. The easiest way is to select the first item you want to move (it could be a file or a folder) and then hold down shift and select the last item.

Moving the Files
For the next step you will need Chrome. When you upload the files you have a couple of options on how the files will look when they get to Drive. Option one: you can leave the files as they are; the file format will not change. For example, Word documents will be uploaded as Word documents. The downside is they are more cumbersome to edit, collaborate, and access offline. Option two: you can convert all of your Office documents to Google documents. The benefit is easier editing, collaboration, and offline access. You can even download Google Documents as Office documents. (Do I sound a little biased?) To enable Drive to convert your files you need to enable it by:

Selecting the gear icon in the upper right corner>upload settings>Convert uploaded files to Google Docs format. (See below)

Now that we have that out of the way we can upload the files.

1. Open a Chrome browser tab and access your Drive.
2. Press the upload button to the right of the red “Create” button and select “Folder” from the menu. (See picture below.)

3. Another menu will come up and from there you will select the folder that you created earlier. Press “Upload” and a new window will open showing the progress of your upload. I will warn you that you if you have a lot of files to upload it will take time so start the upload in the morning.

Unpacking
Now that you have all your files on Google Drive it is time to unpack.

1. Open your newly uploaded folder and click on the check box next to “TITLE”. This will select all the items in the folder.

2. Next, select the “Move to” icon (it is a gray folder) and select “My Drive” from the menu that appears. Click done and you are unpacked.

3. Now you can go back to the original folder you uploaded and delete it.

That, ladies and gentlemen, is the easiest way to upload all your files from your computer to Drive while still keeping everything organized.

I hope you enjoyed, or at least learned something.

Cody

Top 5 Add-ons for Teachers


Add-ons enable you to customize the functions of Google Docs. These can range from

bibliographies to graphs and charts to speech recognition. In this post I’ll be giving my top five picks for add ons for teachers to make life a little bit easier. It´s hard to rank these because of the varied uses, so these are in no particular order.

1. Consistency Checker

Consistency Checker is a great add-on for formal writing. What it does is it scans for errors (such as hyphens, numbers in sentences, spelling consistency, typos, and abbreviations) and it makes sure everything is uniform. It takes a lot of the technicalities out of writing and creating documents. If you´re not an English teacher, this is a nice add-on to have

2. EasyBib Bibliography Creator

EasyBib has saved me quite a bit of time already. Now that it’s an add-on for Google docs, It makes a huge difference. Now works can be sited without having to go an external application of the web. Bibliographies are a great way to keep students up to date and able to find sources.

3. Lucidchart Diagrams

Without going online, it’s really difficult to get diagrams and charts into documents. With Lucidchart, its easy to put charts and diagrams into documents. Whether its flowcharts or diagramming, this add-on is a great tool.

4. Speech Recognition

This add-on doesn’t really do anything special. it just lets you create an entire document without touching a keyboard. This is by far, one of the best speech-to-text programs i´ve ever used. Even between multiple people, this software keeps pretty good pace with almost pinpoint accuracy. I was actually impressed.

5. Texthelp Study Skills

Highlighting is important to showing the key parts of a document. Study Skills lets you highlight, group your highlights, and sort them into different subjects. This is a decent add-on that lets you do some pretty basic things, its just a nice thing to have when working on a presentation.

Understanding the Goo.gl URL Shortener Extension

Understanding the Goo.gl URL Shortener Extension

Understanding the Goo.gl URL Shortener Extension

The Goo.gl URL Shortener is an extension provided by the google chrome store. This extension will add a button to your toolbar enabling a shortened URL with a click of a button, and once it’s shortened, the new URL will be automatically copied to your clipboard. There are also option for creating a QR code and seeing your apps history ( if you are signed into your google account). This is useful for sharing a google forms link or any other long, drawn out URL, making it easier to share and easier to type for those those needing to access the site.

Cite: http://goo.gl/fI9KSf ( for the picture)

Google Groups – A Way to Discuss and Work as a Unit

On the top left of the page there is a red button that says ‘create group’ on it. Click this.


First you will need to decide on a group name, once that is done you can put it in the box titled ‘Group Name’

Then you will need a group email that everyone in the group can access ex: rcbulldogs@googlegroups.com

Now you will need to provide a description for your group, maybe stating the purpose of the group.

Now you will need to select a group type. There are four options that range from Q&A to a simple Email list

There are also basic permissions that control who view, post, and join on the group forum

Depending on the preferences you have will determine your choices

And you can control who views the group by selecting the options in ‘View Topics’

You can control who posts by selecting the options in the ‘Post’ section

You can control who joins your group using the options shown in ‘Join the Group’


Step 2 – Starting up your group

Adding a Welcome message – Adding a welcome message is a nice touch to provide a friendly welcome for new members of your group. You can do this by clicking ‘add welcome message’ located at the top of the page.

Creating your first post – By clicking ‘New Topic’ on the top left of the page, you can create a new post that members of the group can discuss on, or you can just make a simple announcement.


Hopefully this post has helped you understand Google Groups a bit more