Simple but Useful Extensions

What’s an Extension?

Chrome extensions are small software programs that give more functionality to the Chrome browser. The extensions you download from the Chrome web store show up next to the search bar. There are extensions for basically anything from spell check to super addictive games like Papa’s Pizzeria.

How Can an Extension Help Me?

Extensions are great for quickly accessing things you use daily such as Google Classroom. They come in handy when you do not want to open a new tab. There are a bunch of extensions out there that can help with simple things such as spelling and grammar. Extensions are quick and easy to use. Some of the most useful extensions are notepads and sticky notes which work great as a planner or to-do list.

Which Extensions Should I Use?

The following extensions are ideal for writing essays or making presentations. The specific instructions for how to use each individual extension are on the download page.

  • Cite This For Me: Website Citer
    • This is great for when you’re writing an essay, but don’t want to take the time to cite every website. The extension has MLA, Harvard, APA, and Chicago forms of citation.
  • Palette Creator
    • To make a dazzling presentation, use this extension to create the perfect color scheme. When you right click on a picture, it gives the option to create a palette. This palette is not only aesthetically pleasing but also creates a better flow and an overall more appealing presentation.
  • Grammarly
    • Grammarly checks not only the spelling but also the grammar of your writing. All that you have to do is copy and paste the writing into the extension and recommendations changes will appear.
  • Google Dictionary
    • When you’re reading an article, and don’t know the meaning of a word, all you have to do is click the extension for a quick definition.

Access on Chromebooks

Access on Chromebooks

Lately, we have been receiving more than a few questions about turning on and off access to different components on the Chromebooks.  Although there are numerous functions on the Chromebook that require a Chrome Squad member to access and change, there are also a few components that can be switched on and off manually without the C4L’s assistance.  The following is a list of functions that you have access to on your Chromebook:


  • Keyboard Settings:


      1. If you have a foreign language class that has required you to add the US International Keyboard settings, you might find yourself forgetting to turn that off when you go to your next period.  Keeping this type of keyboard component on can prohibit you from other keystrokes in the future.  To change the keyboard settings back to its original US Keyboard function, all you have to do is click on your account icon at the bottom right hand corner of your screen.  Click on the keyboard icon (second row).  There, you will be able to change the settings by clicking back on US Keyboard.


  • Bluetooth:


      1. Bluetooth enables you to wirelessly send files back and forth between another electronic device.  To enable or disable your Bluetooth settings, just click on your account icon at the bottom right hand corner of your screen.  Click on the Bluetooth icon (fourth row).  There, you will be able to turn on or off Bluetooth.


  • Wifi:


      1. There are quite a few students that come into the C4L Lounge with questions about their wifi.  To manage your wifi settings, all you have to do is click on your account icon at the bottom right hand corner of your screen.  Click on the wifi icon (third row).  There, you will be able to choose from the multiple wifi accounts available at Royse City High School.  I recommend choosing RCISD-Guest since it is the only one that doesn’t require a password and is the easiest to access.


  • Sound Settings:


    1. In my past short experience of being a member of the Chrome Squad, I’ve encountered a couple of classmates who have had trouble with their sound settings.  Usually, when they went to plug in their headphones, they couldn’t hear any sound being emitted or it would seem as if their speakers had been blown out.  A reliable solution to this problem is clicking on your account icon at the bottom right hand corner of your screen.  Then, click on the arrow pointing right that is beside your sound bar.  You can then change your Output settings to Speaker (Internal) and your Input settings to Microphone (Internal).  Doing so should take care of the issue.

Hopefully, these four solutions will come in handy if you ever have any problems with accessing different settings on your Chromebook.  If you still have any questions, don’t be shy to swing by the Chrome Lounge and look for either Mr. Holt or one of our C4L members to lend you a hand.  We will always be here for your technology needs!

Behind the Scenes: Connect Store

Behind the Scenes: Connect Store

What is the Connect Store?

The Connect Store is the new shopping area that is being established by the Chrome Squad.  It is also classified as another one of the branches that grows from our technology organization.  The Connect Store allows staff and students alike to have the unique opportunity to purchase gadgets and accessories that pertain to Chromebooks.  The Connect Store also sells electronics, such as headphones, and writing utensils, such as pencils, pens, and highlighters.  The Connect Store is here for all your technology needs.

Meeting the Workers Behind the Connect Store?

The weight of managing and working the Chrome Squad’s store is upon three members of C4L–Jake Richter, Skylar Suydam, and Bryan Barnes.  Jake Richter, a senior academically and a senior member of the Chrome Squad, takes the lead position of managing the Connect Store.  When he isn’t collaborating with other members on store designs and making orders, you can find Jake voicing his opinion on the Debate Team from our school.  Debate is something Jake is super passionate about, and it helps with his negotiating skills when it comes to our C4L staff meetings.  With Jake having seniority regarding the Connect Store, he gives excellent management to this branch of C4L.  Skylar, a senior, is a new member of the Chrome Squad.  When she isn’t learning management skills and part taking in the various tasks required to run the Connect Store, you can find her studying away for her college major in biomedical engineering or practicing her Jiu Jitsu moves.  There are definitely two sides to Skyler–brains and beauty, so she’s just the type of well-rounded employee needed to take on the Connect Store.  Bryan Barnes, a junior, is also a new member to the Chrome Squad.  When he isn’t searching up new furniture for the store or taking down orders online, you can find him putting himself in the various academic and athletic activities we have here at Royse City High School, such as NHS, Student Council, Interact Club, GSA, Cross Country, and Track.  Bryan has a lot on his plate, yet he also makes time to do what he needs to do to make sure the Connect Store is up and running smoothly.  His quirky, positive attitude helps make the environment within the Connect Store branch of C4L more relaxed when there is more than a few things on their checklist.

Impact of the Connect Store

Since the Connect Store is a relatively new extension of C4L, the entire Chrome Squad as well as student and staff of RCHS can undoubtedly anticipate BIG things from them.  The workers behind the scenes all play their pivotal role in manning the ship.  They allow non-members of the Chrome Squad to be updated in the latest technology equipment and accessories while starting the journey that leads to the goal of allowing C4L to be able to fund ourselves from the profits of the Connect Store.  It sure was a work in progress, but from seeing all the hard work that has been and will continue to be put into every aspect of the Connect Store, it is obvious this branch is a winner.  The Connect Store, which is in the flex space downstairs diagonally from the Chrome Lounge, is set to open around the time of Thanksgiving, but you can already begin purchasing items on our website.  We hope everything that is offered from the store can be of service to you! Thanks to Jake, Skylar, and Bryan, we can continue to take those never-ending steps towards improvement of the Chrome Squad.  We’ll just keep getting better and better with wonderful people like them working behind the scenes.

Behind the Scenes: Blog Post Team

Behind the Scenes: Blog Post Team

What is the Blog Post Team?

The Blog Post Team is yet another important part of our distinguished C4L organization at Royse City High School.  The primary purpose of the Blog Post Team is to write informational and tutorial blogs that can be used to benefit both teachers and students alike.  The Blog Post Team is quite similar to the Video Team in which both help everyone who has a Chromebook utilize it to its maximum potential.

Meeting the Girls Behind the Blog Post Team

That’s right! The Blog Post Team is the only branch of the Chrome Squad that is 100% operated by girls.  These empowered females include Laura Vause, Maggie Carrion, and myself, Britni Sanchez.  We are all juniors with myself and Maggie being new members to C4L and Laura being a veteran member.  Because of her seniority, Laura is sort of like the head of this branch.  However, she is always open to new ideas and suggestions by me and Maggie.  When she isn’t coordinating the team’s goals for each six week term, Laura is busy applying herself to her studies, participating in extracurricular activities such as NHS and Student Council, and helping her friends whenever they need someone to talk to.  Laura is involved with her church, as well, and is always there whenever anybody needs her assistance.  Maggie has an influential voice as part of the Blog Post Team, too.  When she isn’t being of assistance to those who come into the C4L Lounge with questions about their Chromebook, Maggie is participating in intellectual programs, as well, where she is an officer in NHS and SNHS and a member of Student Council.  She also devotes a substantial amount of her time to her swimming team where she swims circles around her competitors.  I play my role as a new member of the Blog Post Team, as well.  When on duty, you can find me learning new technological information from my fellow Chromies and helping others with their Chromebooks in any way I can.  Outside of C4L, I am involved in NHS, SNHS, Student Council, Interact Club, and BPA.  On the weekends, you can find me worshipping and hanging out with my friends at my church both Saturdays and Sundays and volunteering for the children’s ministry at my church Sunday mornings.  I always try to keep the positivity flowing both in and outside of C4L.

Impact of the Blog Post Team

Since the Blog Post Team is made up of three of the five female members of the Chrome Squad, I’d say we have some serious girl power up in this branch of C4L.  The Blog Post Team plays its role as a critical puzzle piece to the Chrome Squad by spending time thinking about technology problems, writing about their solutions, and informing the staff and student body of Royse City High School about the hard-working young adults behind each section of C4L.  The Blog Post Team has been an element of the Chrome Squad since it was first established last year, and I know it has already made a lot of progress in efficiency and will continue to improve as the members of this division continue to grow as technology experts and as individuals.  As a whole, the Blog Post Team wishes to help anyone in need, spread positivity, and continue to shed some light on the students behind this prominent organization we call the Chrome Squad.

Video Based Presentation Tools

Video Based Presentation Tools

Video Based Presentation Tools

Adobe Voice

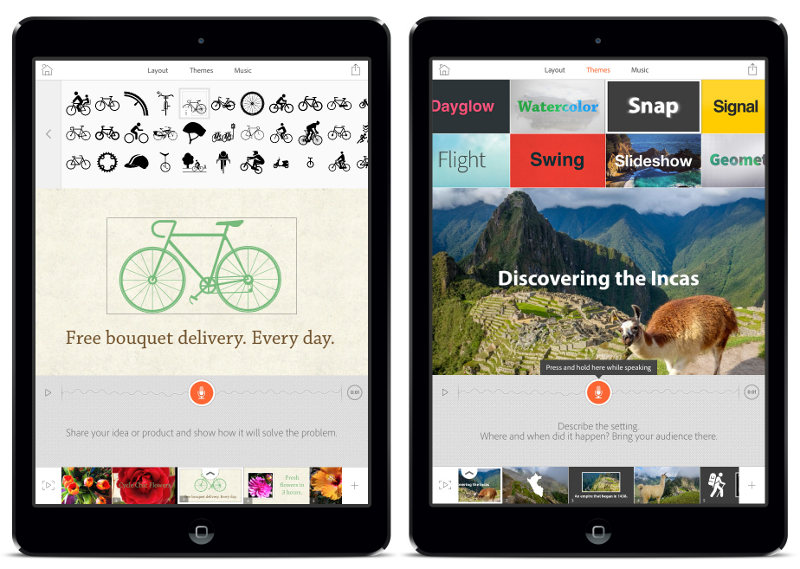
This is one of only two tools on this list that isn’t device agnostic.  Adobe Voice only runs on iPads, but it is such a cool tool I had to keep it on this list.  The idea is simple:  your voice is the star of the presentation. If you have a voice like mine you are probably saying no way, but it isn’t as bad as it sounds.  You pick a video type and template, drop in some icons or pictures, and ad your narration.  Adobe Voice takes care of the the timing and animation to create a professional quality video in minutes.


Touchcast

Touchcast is another video presentation tool that isn’t completely device agnostic.  You have to create the videos on an iPad or with a desktop app, but you can watch the videos on any device through the free Touchcast service.  The great thing about Touchcast is it is more than just a video recorder.  It has built in tools like inlays, teleprompter, annotator, and vApps just to name a few.

“Hacked” Presentation Tools

Blogger

Blogger isn’t technically a presentation tool because it actually a blogging platform, but I have used Blogger several times for presentations.  Because it is a blog it will be more text heavy than other tools, but that is a benefit if you want students to go through a presentation at their own pace.  I use Blogger for professional development because it is a great place to warehouse a lot of information that I can pull up for a quick presentation or refer people to if they need help.

Smore

Smore is a great newsletter creation tool but works equally well as a presentation tool for teachers.  With Smore you can create visually stunning presentations with a combination of text, graphics, and videos, slideshows, links, and more.

Tackk

If Haiku Deck married Twitter, their child would be Tackk.  With this tool it is super simple to create beautiful presentations and then share with the world.  From their registered users can comment on and share presentations.

Web Ready Presentation Tools


Piktochart

I love Piktochart.  Piktochart is an infographic creation tool that is simple to use and requires little to know graphic design experience.  You can use either professional pre-designed templates or start from scratch to create infographics fit for flyers, posters, websites, or presentations.  The added ability to add live updating charts and really cool transitions makes this a really powerful presentation tool.

Canva

Canva started off as a web based graphic design tool for novices that wanted to make a polished graphic without the fuss of Photoshop.  Since then Canva has developed into the go to place for web based graphic creation.  It is user friendly, chalk full of helpful guides and templates and even has a presentation tool.  It gives you the beautiful look of Haiku Deck with the flexibility of Piktochart.

Thinglink

Thinglink makes it on this list because when it comes to audience driven presentations Thinglink is the way to go.  Thinglinks consist of a background image that has interactive dots layered over the top of it.  The dots can be links to websites, videos, documents, social media feeds, etc.  It is a great way to let students explore content at their own pace and in their own way.

Using Infographs in the Classroom

Infographs/infographics are a great way to visualize and organize information.  A quick Google search will show millions of infographs with info ranging from the parts of a hamburger to the impact of plastic waste on marine life.  The reason for the rise in the popularity of infographs is largely due to the fact that they no longer require the knowledge of a graphic design to create.  Sure, you can use Photoshop or Illustrator, but other free web tools, like Google Drawing and Piktochart, make infographics accessible to everyone.

In regards to data or historical facts it is easy to see the value of putting the information in a visual format like infographs.  What is less obvious is how infographs can be used to explain intangible information like analysis or mathematical theorems.  I recently had my students create infographs charting/explaining motifs in the first five chapters of The Great Gatsby.  I gave them four simple guidelines and two means by which to create the infographs.

Guidelines:

  • The infograph must have 5 or more graphical elements (i.e. charts, graphs, pictures, etc.)
  • The infograph must show the progression of the motifs
  • The infograph must cite evidence of the motifs throughout the first 5 chapters
  • The infograph must explain the importance of the motifs
Creation Options:
  • You can create the infographic on butcher paper
  • You can create the infographic using Piktochart or Photoshop
For those of you that don’t know Piktochart is a free, web-based infograph creator.  It took a little time for the kids to get accustomed the the user interface, but once they did it was second nature for them.
It was also important to publish the infographs for a real audience.  So they added them to their blog, and I added them to a Thinglink (above) that I tweeted out.