Be More Productive with Focus.me and Writer!

Downloading Focus.me

To download Focus.me you must first access the chrome web store . Once here type in the search bar focus.me and hit enter. Focus.me will be the first option under the title ‘Extensions’. Click ‘add to chrome’ and you can begin your experience.

Options and Settings

To access options, right click on the icon

  • User Preferences: In this part of the options and settings page you can select the time increments for site blocking. You can also modify the list of sites to be blocked when focus.me is activated.
  • Import and Export: In this part of the options and settings page you can import or export your list of blocked websites. This can be helpful when sharing lists with others who have the same extension

How Focus.me Helps You

Focus.me is a unique extension that aims to help you stay focused by blocking self-selected websites. One of the key features of this extension is that once you set the time for websites to be blocked, you can’t unblock them until the time runs out.

How to Access Writer

First things first, you must download Writer. To do so, you must go to the chrome web store and type in the search bar “writer”. This app will be the first option under the tab labeled “Apps”. Click add to chrome and you are ready to begin. To access the app click on the 9 little box icon in the top left corner of your screen. This will pull up all your apps. Select writer and begin writing your masterpiece!

How it Works

Once you open the app you can begin writing. To access options click on the gear icon at the bottom middle of the screen.

  • Interface: This tab is where you can choose the color of the font or background. You can also choose the font type and size as well as line spacing. You can also enable typing noises and keyboard shortcuts. On the right-hand side of the screen, you can see a sample of the changes you make to the display.
  • Account: In this tab, it displays your user information such as OpenIDs and your email address. Here you can edit personal information and change your password.
  • Extras: In this tab, you can select different options to aid you in writing. You can type in how many words to a page for page counting and other features. This tab also shows features you can use if you upgrade to a pro account.

Why does Writer Help You Stay Focused?

Writer helps you stay focused when writing because the interface is simple. There are limited options as far as things you can do to the document so it is easier to stay focused when writing. The default settings for Writer are a black background and green font so this blocks out all distractions on the screen. This app helps you to stay on task while writing masterpieces!

Stay Focused With Turn Off the Lights

Stay Focused with Turn Off the Lights

Turn Off the Lights is an extension in which you can block out the background of any web page or site that has a video. This makes it to where you can focus solely on the video instead of all the background nonsense. It is also useful for those who are sensitive to light or the bright glow of computers.

How to Download Turn Off the Lights

The way to download Turn Off the Lights is to access the chrome web store. Click on the option ‘extensions’ on the sidebar. Type “turn off the lights” into the search bar and hit enter. The first option will be the extension you use. Click ‘add to chrome’ and the extension will be added to your toolbar. The icon for the extension is a light bulb that will appear in the top right of your tool bar. To get to options right click on the icon and select ‘options’.

How it Works

Basics:

  • Screen – these options allow you to change colors, opacity, and background of the screen behind the displayed video.
  • Autoplay – this option allows you to decide if you want Turn Off the Lights to automatically dim the screen when you press play on a video, brighten the background after the video stops, or automatically dim certain sites.
  • Autostop – autostop options do the exact opposite of autoplay; once selected videos will stop automatically when you access select website.
  • Youtube – this option allows you to pick and choose what you want to show on Youtube when you use Turn Off the Lights to dim the screen

Visual Effects:

  • Atmosphere Lighting – with atmosphere lighting options users can add a colored blur behind the video  or other visual effects.
  • Fade In/ Fade Out – this option controls how the effect appears; with this selected the effect will fade in and out when the video is selected or clicked off of.
  • Reflection – adds reflective effect to video
  • Audio Visualization – here you can change the  video audio visualization opacity

Advanced Options:

  • Flash Detection – this option when activated detects Flash objects which can sometimes interfere with the playing of videos.
  • Dimness Level Bar – when lights go out you can choose to see the dimness level bar or not during your viewing experience.
  • Video Volume Slider – this option creates a slider where you can change the volume of the video by scrolling on the mouse whenever turn off the lights is activated.
  • Video Toolbar – when this option is activated you will see a toolbar below your video screen and will be able to access many tools to aid in your viewing experience.
  • Video Hover – after a certain amount of seconds when you hover your mouse over a video element it will automatically play
  • Video Speed – here you can change the playback speed of the video
  • Eye Protection – this option allows you to choose when the screen dims whether it be during videos or when certain web pages open up.
  • Shortcut keys – in the advanced options tab there is a compiled list of key shortcuts that you can use when this option is enabled.
  • Bulb – here you can choose your favorite lamp icon and change the themes of your web page brightness when turn off the lights is used

Night Mode:

  • With the Night Mode option, you can switch modes from light to dark depending on the time of day.
  • If you are sensitive to light this is especially helpful
  • In this tab, you can select certain sites to activate night mode on as well as what time of day night mode can be accessed
  • Another option is where the switch that you click to access night mode appears on your screen

Camera Motion:

  • To use this feature you must first enable the camera motion option.
  • With this selected when you move your hand/fist from the top of your screen to the bottom, the dark background will slide down.
  • To make sure the camera motion works correctly you will have to make sure of two things:
    • Make sure that your room has enough light, but the camera is not receiving direct sunlight
    • Make sure you use your front-facing camera

Speech Recognition:

  • When you enable this option you can speak one of many commands to the browser lamp:
    • Turn off the lights
    • Turn on the lights
    • Play video
    • Pause video
  • To turn this on you have to select the dialect of which you speak

TOtL Welcome Guide:

  • This tab is where you can access the TOtl welcome guide. This guide allows you to learn even more about the extension Turn Off the Lights and explore its many features.

Help:

  • In this tab, you can report an issue or access the extensions website and developers.


Declutter with Toby

Declutter with Toby

Declutter with Toby

Everyone hates having millions of tabs open at once. It’s super stressful and looks cluttered. Luckily, there’s Toby, a useful extension that de-clutters your tabs and organizes them into one page.

How to get Toby

  • Click on the link here which will download the extension. The extension will appear next to your search bar
  • Sign up for a free account with your email

How to use Toby

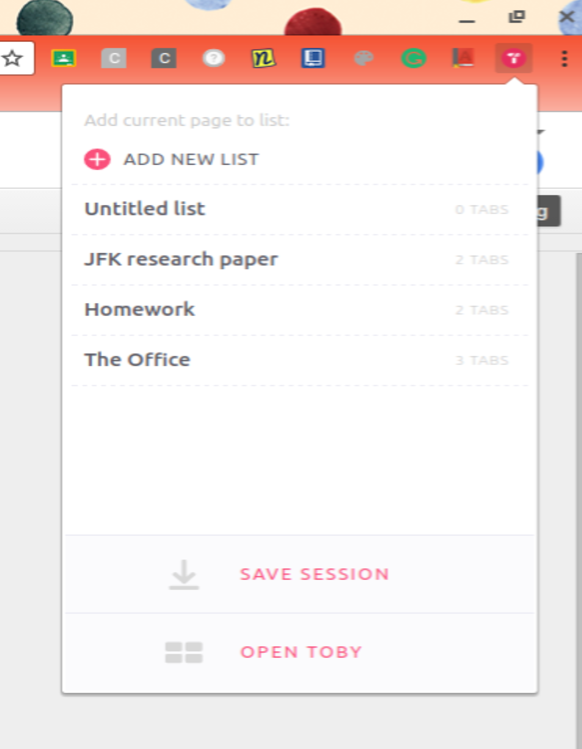
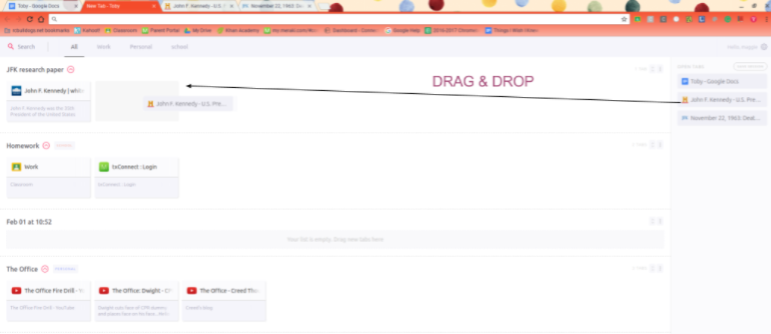
  1. Now that the extension is downloaded, every time you open a new tab the Toby screen will appear. The tab will read “New Tab- Toby.” On this screen, it displays all of your open tabs and lists. A list is a collection of websites that you have saved. These can range from project references to funny youtube videos.
  2. To add a new list for homework, school, research papers, etc. just click the pink plus sign at the bottom right side of the page. This lists organizes all your tabs into one list for quick and easy access. From here you can add open tabs onto that list.
  3. You can access your lists by opening a new tab or by clicking the Toby icon in the upper right-hand area.

When you open the Toby Tab, it should look something like the image to the left.

Out Googling Google

Google is obviously the best search engine out there (sorry Internet Explorer). However, Google can get really frustrating, especially when you just can’t seem to get the right results. So down below are some symbols that will help you make the best out of Google.


Quick Tricks
Asterisk

Use an asterisk in place of a word to help find different variations of a phrase. Ex. * into the sunset, this would populate titles that have “into the sunset” in the results and the first word will vary

Minus

Put a minus sign in front of a word that you do not want in your search results Ex. how to groom a dog -cats, this would include only results on how to groom dogs, and no results will pop up about cats.

Pictures

When searching for specific types of pictures, you can filter out the ones you don’t want by clicking the “tools” option directly under the search bar. Some of the characteristics you can filter by are size, color, and type.

Quotes

Phrases put into quotes will populate strictly the phrase within the quotes. Ex. “Goat Yoga,” googling goat yoga will show results only pertaining to goat yoga.

In addition to the tips above, there are also simple tricks that making Googling easier. On the right-hand side of the search bar, there is a microphone that allows you to search by your voice. All you have to do is click the microphone, and whatever you say will pop up in the search bar. This tool is great for when you don’t know how to spell certain words. And if you’re just bad with words in general, then this next tip will help as well. By typing a number into the search bar, and put “=english,” it will transform the number into word form.  If you need a timer simply type the amount of time that you need, and a timer will appear. Likewise, if you search stopwatch, a stopwatch will be the first result.

Hopefully, these tricks will help you have better results when using Google, and maybe they’ll even help you out Google, Google.

New Changes to Google Classroom

Every few months, Google makes changes to its products to improve their functionality and performance. As of August 2017, Google has made six new modifications to the app Google Classroom.

Google Classroom is an app that students and teachers alike use throughout the school year. Google Classroom is the foundation for a satisfactory classroom dynamic; likewise it is imperative that teachers keep informed about the updates put out every month. The six updates to Google Classroom precede as follows:

Display Classroom Code

The first change that Classroom has undergone is the ability for teachers to display their classroom code. This makes it easy and painless for teachers to give students their classroom code. This feature is accessible through the STUDENT tab on Classroom- on the left side of the page the code is displayed with a drop down arrow with the options display, copy, reset, and disable. Click on display to enlarge the code. (This can be helpful when displaying the code on a projector screen)

Transfer Classroom Ownership

A feature in Classroom is the transfer of classroom ownership. With this new update teachers that are leaving the school or changing subjects they teach can transfer the class ownership to another teacher. This allows the other teacher to be the co-teacher of the class. If the co-teacher accepts the transfer they become the primary owner of the class and the first teacher becomes the co-teacher.

Use the Google Bar

The google bar is a tool that has been recently added to Google Classroom. The bar allows you to switch between google apps, manage notifications, and manage google accounts. This new innovation makes it easier than ever for teachers to use other google apps along with Classroom.

Student’s Can See Their Work

On the homepage of Classroom where all the classes are displayed students can click on an icon (clipboard) to show their individual work in that class. Here you can filter your work for the class into three categories: assigned, returned with grade, and missing. This feature makes it easier for students to stay on top of their work and organize the assignments they have and haven’t done.

Decimal Grades

As of the August update teachers can now input decimal grades. To do so first you must click on the assignment you are trying to grade. Next to the student’s name click “Add Grade” to enter the grade. Google supports two decimal places and if you choose to do more than that it will automatically round to 2 decimal places.

Reorder Class Cards

With this new update Google Classroom allows you to rearrange class cards. To do so you need to go to the homepage for Classroom. You have several options for moving class cards. The easiest way to do this is to drag the class card to the spot you want it to be. You also have the option to click on the icon of three vertical dots – this will bring up the option ‘MOVE’. This allows you to place it after a certain class, to the beginning of the list, and to the end of the list.

Behind the Scenes: Tech Tips Team

Behind the Scenes: Tech Tips Team

What is the Tech Tips Team?

The Tech Tips Team, along with all of the other teams within our Chrome Squad, plays a vital role in operating our system.  Have you ever stopped and noticed those helpful and oh-so-informational posters throughout the hallways of our school?  Well, those posters have been hung up for your convenience by the two members of the Tech Tips Team.  This branch of C4L is here to provide all of the basics and quick, helpful facts about everything regarding your Chromebook.  The Tech Tips Team also sometimes pairs up with the Google Classroom Team to provide some of these tidbits through the Chrome Squad’s google classroom account, so be sure to be added to the class!  Overall, the Tech Tips Team is able to answer most questions that a lot of Chromebook users might have.

Meeting the Members Behind the Tech Tips Team

The job of the Tech Tips Team is distributed between two of our Chrome Squad’s members–Robert and Vilma.  Robert, the team lead, is a junior this year.  When he isn’t printing Tech Tip posters for the students and staff, you can find him slaying his opponents on his X Box or playing soccer.  Since Robert wishes to become a computer engineer, his work that he accomplishes and his background that he will have acquired will definitely help him achieve that dream in the near future.  Vilma, on the other hand, is a sophomore.  When she isn’t brainstorming new ideas for tips to help answer any Chromebook questions, you can find her marching her little heart out on the football field playing her clarinet, performing in our musical theater program, and dreaming about Broadway…literally.  Aside from her musical performances, Vilma also has the desire to become an astrophysicist.  Without a doubt, both Robert and Vilma have more than what it takes to be successful Tech Tips helpers and do more than what is required of them to give anyone the answers to their questions.

Impact of the Tech Tips Team

The Tech Tips Team plays more to the customer service aspect of our Chrome Squad.  They provide the solutions to the problems that you may not have even encountered yet!  You might not think to take a second glance at those “hidden” posters throughout the hallways, but they just might come in handy someday.  One of the Chrome Squad’s purposes, as a whole, is to teach the students and staff how to fix their own problems and how to answer their own questions.  The Tech Tips Team definitely plays to that strength of ours by providing resources for Chromebook users to do just that.  Overall, the Tech Tips Team helps consumers help themselves, although whenever you have a problem, the Chrome Squad is always delighted to help you in any way we can!

Robert

Robert

Tech Tips Team Lead

Vilma

Vilma

Tech Tips Artist