Healthy Extensions for Techies

Working on the computer all day can be very tiring; backs begin to ache from slouching, eyes burn from staring at the big bright screen, and fingers cramp up from tireless typing. Luckily there are extensions to prevent the problems that come along with using computers 24/7. Posture Minder and Save My Eyes are extensions that help your health.

Posture minder

A lot of people have the tendency to slouch when they are on the computer, and this particular extension reminds you to sit up straight to prevent back pains and strains. The reminders come as pop-ups on the screen with a tiny message that may be something like, “Sit up straight, chum.” You can set reminders on any time interval you choose, and there is also an optional alert sound. Not only does the extension remind you to sit up, there is also an option to set walking reminders that tell you to get up and walk around to save your back from painful aches.

Save my eyes

When you binge watch Netflix for hours on end, your eyes probably begin to burn. This extension is a very simple and easy solution to burning or watering eyes due to computer use. Save My Eyes reminds you to take a break when working on the computer. All you have to do is set how long you wish to work on the computer and how long the break will be. Then simply click start to begin saving your eyes. The extension will reduce eye fatigue and dryness when you have a long day at work or late night Netflix binging. 

Everyone uses computers, and everyone experiences the pain that comes with them. In order to avoid the pain, download these extensions to save the health of your back and eyes. But if you ever need a break from the alerts, both extensions may be turned off.

Become a Presentation Pro with the New Slides Update

Google Slides has come out with a new update with new interesting features. This update incorporates Google Keep, Linked Slides, and a few other features users were itching to get on the site. With this new update the already user friendly Google Slides becomes even easier to use, and can help any presentation look sleek and professional.


Jot down in Keep, then bring them to Slides

For RCHS Students, Google Keep is already installed in our apps and can be found by clicking the search button, then clicking “all apps”. Google Keep is a fast and easy way to take note of group ideas and keep reminders of dates at your fingertips. But by using Google Slides’ drag-and-drop integration you can put these two great apps together! All you have to do is click “Tools”. Then, go to Google Keep, select notes from Keep, and drag them into the Slide you wish the note to be on. When you add a note from Keep into your presentation, Slides will add a title and description for you automatically.


Manual Updates are a thing of the past using Linked Slides

When using the same information for different presentations, copying and pasting onto different different projects can be a drag. With Linked Slides, in seconds you can copy information from one slide, paste on a different presentation, and then link them together, so they have the most up-to-date data.


Users asked Google Slides updated

  • Insert Diagrams, or ready-to-use visuals. This is very useful for when you need to share timelines with others in a group.
  • Select Grid view to view all your slides at once. This helps you easily rearrange or change formats of multiple slides.
  • Customize your presentations to different audiences with the Skip slide feature. You can now choose to skip select slides without completely deleting them when you present from your phone or laptop.

By using these new feature updates you can make your presentations in a flash but still keep the professional look Google Slides provides.

Be More Productive with Focus.me and Writer!

Downloading Focus.me

To download Focus.me you must first access the chrome web store . Once here type in the search bar focus.me and hit enter. Focus.me will be the first option under the title ‘Extensions’. Click ‘add to chrome’ and you can begin your experience.

Options and Settings

To access options, right click on the icon

  • User Preferences: In this part of the options and settings page you can select the time increments for site blocking. You can also modify the list of sites to be blocked when focus.me is activated.
  • Import and Export: In this part of the options and settings page you can import or export your list of blocked websites. This can be helpful when sharing lists with others who have the same extension

How Focus.me Helps You

Focus.me is a unique extension that aims to help you stay focused by blocking self-selected websites. One of the key features of this extension is that once you set the time for websites to be blocked, you can’t unblock them until the time runs out.

How to Access Writer

First things first, you must download Writer. To do so, you must go to the chrome web store and type in the search bar “writer”. This app will be the first option under the tab labeled “Apps”. Click add to chrome and you are ready to begin. To access the app click on the 9 little box icon in the top left corner of your screen. This will pull up all your apps. Select writer and begin writing your masterpiece!

How it Works

Once you open the app you can begin writing. To access options click on the gear icon at the bottom middle of the screen.

  • Interface: This tab is where you can choose the color of the font or background. You can also choose the font type and size as well as line spacing. You can also enable typing noises and keyboard shortcuts. On the right-hand side of the screen, you can see a sample of the changes you make to the display.
  • Account: In this tab, it displays your user information such as OpenIDs and your email address. Here you can edit personal information and change your password.
  • Extras: In this tab, you can select different options to aid you in writing. You can type in how many words to a page for page counting and other features. This tab also shows features you can use if you upgrade to a pro account.

Why does Writer Help You Stay Focused?

Writer helps you stay focused when writing because the interface is simple. There are limited options as far as things you can do to the document so it is easier to stay focused when writing. The default settings for Writer are a black background and green font so this blocks out all distractions on the screen. This app helps you to stay on task while writing masterpieces!

Stay Focused With Turn Off the Lights

Stay Focused with Turn Off the Lights

Turn Off the Lights is an extension in which you can block out the background of any web page or site that has a video. This makes it to where you can focus solely on the video instead of all the background nonsense. It is also useful for those who are sensitive to light or the bright glow of computers.

How to Download Turn Off the Lights

The way to download Turn Off the Lights is to access the chrome web store. Click on the option ‘extensions’ on the sidebar. Type “turn off the lights” into the search bar and hit enter. The first option will be the extension you use. Click ‘add to chrome’ and the extension will be added to your toolbar. The icon for the extension is a light bulb that will appear in the top right of your tool bar. To get to options right click on the icon and select ‘options’.

How it Works

Basics:

  • Screen – these options allow you to change colors, opacity, and background of the screen behind the displayed video.
  • Autoplay – this option allows you to decide if you want Turn Off the Lights to automatically dim the screen when you press play on a video, brighten the background after the video stops, or automatically dim certain sites.
  • Autostop – autostop options do the exact opposite of autoplay; once selected videos will stop automatically when you access select website.
  • Youtube – this option allows you to pick and choose what you want to show on Youtube when you use Turn Off the Lights to dim the screen

Visual Effects:

  • Atmosphere Lighting – with atmosphere lighting options users can add a colored blur behind the video  or other visual effects.
  • Fade In/ Fade Out – this option controls how the effect appears; with this selected the effect will fade in and out when the video is selected or clicked off of.
  • Reflection – adds reflective effect to video
  • Audio Visualization – here you can change the  video audio visualization opacity

Advanced Options:

  • Flash Detection – this option when activated detects Flash objects which can sometimes interfere with the playing of videos.
  • Dimness Level Bar – when lights go out you can choose to see the dimness level bar or not during your viewing experience.
  • Video Volume Slider – this option creates a slider where you can change the volume of the video by scrolling on the mouse whenever turn off the lights is activated.
  • Video Toolbar – when this option is activated you will see a toolbar below your video screen and will be able to access many tools to aid in your viewing experience.
  • Video Hover – after a certain amount of seconds when you hover your mouse over a video element it will automatically play
  • Video Speed – here you can change the playback speed of the video
  • Eye Protection – this option allows you to choose when the screen dims whether it be during videos or when certain web pages open up.
  • Shortcut keys – in the advanced options tab there is a compiled list of key shortcuts that you can use when this option is enabled.
  • Bulb – here you can choose your favorite lamp icon and change the themes of your web page brightness when turn off the lights is used

Night Mode:

  • With the Night Mode option, you can switch modes from light to dark depending on the time of day.
  • If you are sensitive to light this is especially helpful
  • In this tab, you can select certain sites to activate night mode on as well as what time of day night mode can be accessed
  • Another option is where the switch that you click to access night mode appears on your screen

Camera Motion:

  • To use this feature you must first enable the camera motion option.
  • With this selected when you move your hand/fist from the top of your screen to the bottom, the dark background will slide down.
  • To make sure the camera motion works correctly you will have to make sure of two things:
    • Make sure that your room has enough light, but the camera is not receiving direct sunlight
    • Make sure you use your front-facing camera

Speech Recognition:

  • When you enable this option you can speak one of many commands to the browser lamp:
    • Turn off the lights
    • Turn on the lights
    • Play video
    • Pause video
  • To turn this on you have to select the dialect of which you speak

TOtL Welcome Guide:

  • This tab is where you can access the TOtl welcome guide. This guide allows you to learn even more about the extension Turn Off the Lights and explore its many features.

Help:

  • In this tab, you can report an issue or access the extensions website and developers.


Declutter with Toby

Declutter with Toby

Declutter with Toby

Everyone hates having millions of tabs open at once. It’s super stressful and looks cluttered. Luckily, there’s Toby, a useful extension that de-clutters your tabs and organizes them into one page.

How to get Toby

  • Click on the link here which will download the extension. The extension will appear next to your search bar
  • Sign up for a free account with your email

How to use Toby

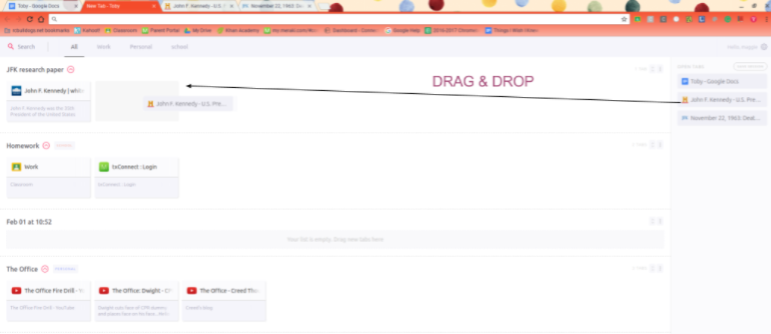
  1. Now that the extension is downloaded, every time you open a new tab the Toby screen will appear. The tab will read “New Tab- Toby.” On this screen, it displays all of your open tabs and lists. A list is a collection of websites that you have saved. These can range from project references to funny youtube videos.
  2. To add a new list for homework, school, research papers, etc. just click the pink plus sign at the bottom right side of the page. This lists organizes all your tabs into one list for quick and easy access. From here you can add open tabs onto that list.
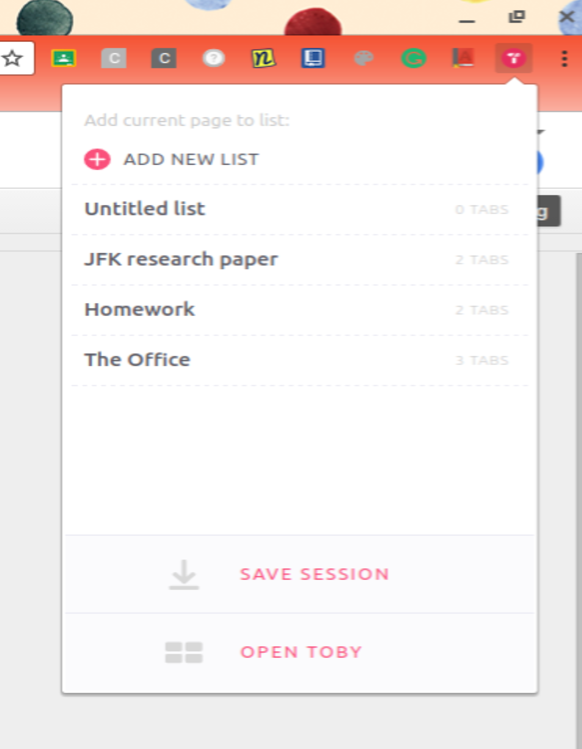
  3. You can access your lists by opening a new tab or by clicking the Toby icon in the upper right-hand area.

When you open the Toby Tab, it should look something like the image to the left.